1.5 Software Installation, Management and Services
Once the business plan has been approved and a decision has been made on which repository software system will be used, the software can be installed. It is recommended that the software first be installed on a test server, then tested, next on a developmental server, then tested, and then finally on the production server, where it should also be subjected to a final test.The deployment, implementation, management and use of an institutional repository system are software specific, and it is not part of the scope of this tutorial to cover the installation procedures. The installation will have to be done by a technical person (hardware (systems administrator) and software technologist (programmer)) with the necessary expertise as indicated in the business plan. The basic steps involved when installing the institutional repository software include:
Step 1: Decide on a URL for the repository
This name should be short and simple to remember, easy to type into documentation and good for marketing/branding. Ensure the name will never change and that it has a clean URL (Uniform Resource Locator) with no forward slash redirect. There are many thousands of websites and your repository will be one of them, so you are fighting for good web visibility and marketing mindshare by selecting a good URL. Whatever you decide, it is very important that you do not change it later for the purposes of preventing "linkrot" and web server "error 404, item not found" errors. Avoid using "dspace", "space", "ir", "repository" or e-something in the URL selection because the connotation is confusing to current users and will be for future users when DSpace no longer exists, you migrate to a different software system, or the "new" concept of an "institutional repository". Discuss the hostname selection with your repository manager/owner and campus network administrator first, before finalising on a name. We recommend the following syntax for the institutional repository web address:http://repositoryname.university.country
Example of a good URL: http://scholar.sun.ac.za
Example of a bad URL: http://sunscholar.sun.ac.za (‘’sun’’ repeated)
Step 2: Register with a handle server, e.g. CNRI handle server
According to the Handle System23 web, handles are persistent identifiers forInternet resources. A handle does not have to be derived in any way from the entity that it names — the connection is maintained within the Handle System. This allows the name to persist over changes of location, ownership, and other 'current state' conditions. When a named resource moves from one location to another, e.g., from an old server to a new server, the handle is kept current by updating its value in the Handle System to reflect the new location. The Handle System is designed to meet the following requirements for persistence:
Handles are:
- not based on any changeable attributes of the entity they identify (location, ownership, or any other attribute that may change over time);
- opaque, preferably 'dumb numbers' from which no potentially confusing meaning can be drawn, and from which no assumptions about ownership or use can be made;
- unique within the Handle System, avoiding collisions and referential uncertainty;
- easy to make user friendly, human-readable, cut-and-paste-able, and can be embedded, if needed;
- easily fit into common systems, e.g., URI specification.
Handle resolution is:
- reliable, using redundancy, with no single points of failure and resolution time fast enough never to appear broken;
- scalable, so that higher loads are easily managed with more computers;
- flexible and easily adapted to changing computing environments and new applications;
- trusted, with both resolution and administration built on proven trust methods;
- built on an open architecture that encourages the community of users to build applications on top of the infrastructure;
- transparent to users who don't need to know the infrastructure details.
A handle system is not an end user system, and it is not off-the-shelf software. It's an underlying infrastructure for identifying resources whose location and other basic information, e.g., ownership, needs to be updated from time to time (Handle System).Handle servers should be installed by system administrators. It is very much like installing a Web server. The server should be installed on a machine with an Internet presence, which should be outside an organization's firewall.Although there are many handle servers on offering, the Handle System is used to explain the structure of the URL assigned to the following digital object: Example: http://hdl.handle.net/10019.1/80915http://hdl.handle.net – Standard to all services making use of the Handle System (CNRI) handle server.
10019.1- Handle prefix assigned to an institutional repository after registering with the Handle System.
80915 – Digital object (unique id) identification assigned to an item in the repository, e.g. DSpace.
Step 3: Install the repository software
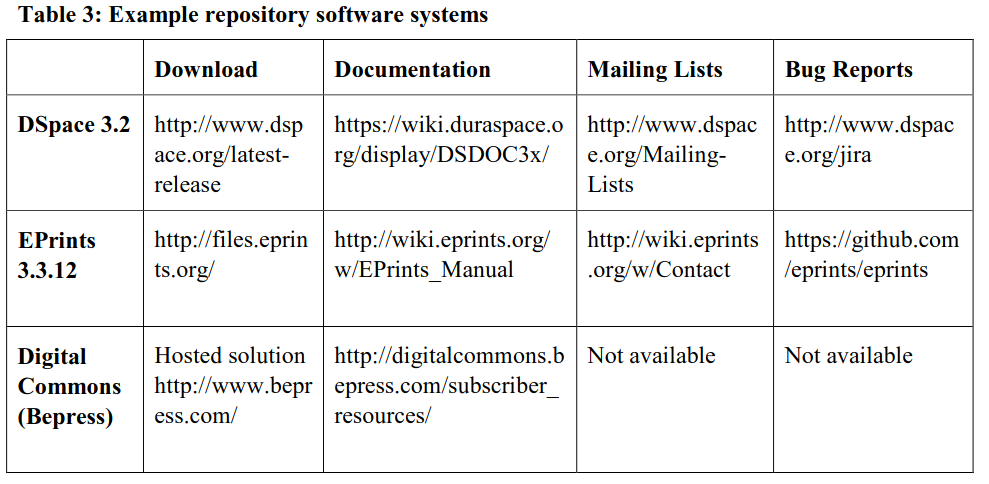
Installation is system specific, and software should be frequently upgraded to the most stable version to benefit from added functionalities and security features. Subscribe to software specific mailing lists to stay up to date on new developments, and visit bug report pages for information on bugs encountered. The basic vanilla interface can be customised to accommodate the institutional branding.
Step 4: Repository System Backup & Monitoring (Disaster Recovery Planning)
Whichever type of repository you use, it is vitally important that you maintain regular backups, and that you verify the backup. If the server fails, you may be able to access a recent version of your files, but without the repository all your history is lost forever. A backup can be done as follows:
- Perform a daily local backup.
- Copy/sync the local backup to two external backup servers (off site).
In addition to the backup it is important to monitor server performance and proactively identify possible problems, e.g. running out of server space, server is very slow, etc. In addition to a backup server use for example munin24 to setup a monitor server.
Step 5: IR Policy
An IR Policy should be compiled to guide users of the system and implement decisions that were made. It is recommended that the following be addressed as part of an institutional repository policy:
- Scope of the IR and OA service
- Service definition
- IR Advisory Group: Terms of Reference (incl. scope, members etc.), Meetings
- IR User Group: Terms of Reference (incl. scope, members, etc.), Meetings
- Submissions Policy: Submitters, Content, File formats (open), Submission Fields
- Collection Policy: Definition of a Collection, Roles, Rights, Responsibilities, Workflow
- Rights, responsibilities & services offered by the Library and Information Service
- Rights, responsibilities & services offered by Central IT
- Rights, responsibilities & services offered by the University
- Licensing, Copyright, Privacy and Intellectual Property Issues (incl. publisher policies)
- Preservation Policy & Support
- Withdrawal Policy
- Workflow Policy
- Metadata Policy
- Authentication
- Service Level Agreements regarding System Availability & System Backup (disaster recovery)
- Memorandum of Understanding
- Communication
Step 6: OA Policy
To make progress in terms of Open Access, a solid Open Access policy should be compiled in a structured way. Open Access policies can be implemented on national level, international level, institutional level, and also by funders. A policy is a formal document which gives an institution the necessary leverage to negotiate with publishers in terms of making research openly accessible. When drafting an Open Access policy for an institution, also consult the Intellectual Property Policy and Research Policy of the institution, as well as agreements between researchers and the institution, e.g. academic staff work agreements. Where necessary, these policies and agreements need to be revised, and all should be aligned. The following resource provides guidelines on developing an Open Access policy:
Step 7: Optimisation and registration with harvesters
For the repository content to be harvested/indexed by search engines and aggregating services, the software needs to be optimised and the repository needs to be registered with as many services possibly. The Repositories Support Project provides some useful guidelines on optimisation, as well as the JISC Digital Repositories infoKit27. Also see How to facilitate Google crawling Notes for open-access repository maintainers28by Peter Suber. In brief some guidelines are:
- Links: For effective web crawling, it must be possible to visit every page and document in your repository just by clicking on hyperlinks – without ever needing to type in text or to use buttons.
- Hierarchy: Keep the hierarchy as simple as possible, so that crawlers don’t need to go to deep to try and access the content. A Browse interface is recommended.
- Sitemaps: Implement sitemaps. A sitemap is a collection of XML files which, in their simplest form, can tell search engines what pages exist on a website, and when they were last updated. These files are typically built each night, and then compliant search engines can be 'pinged' (by visiting a specially formed URL) to inform them that the site map has been updated.
- Robots: Make sure the site does not block robots from crawling the repository.
- Documents: Do not break large documents up in smaller sizes. Keep all together as one document.
- Cookies: Do not request browsers to accept cookies.
- Full text Open Access: It is recommended that all content be available in full text and as Open Access.
- Session-id’s: It is best to allow crawlers to access your sites without session-id’s or arguments that track their path through the site.
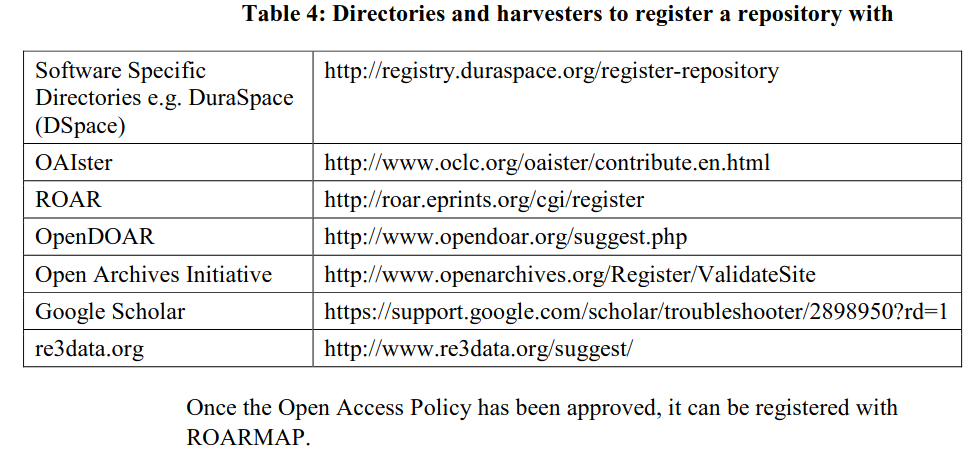
Once the repository system has been optimized, you also need to register the repository with search engines and aggregating services (directories). These services would usually require the base URL of the repository. An example of a base URL: http://scholar.sun.ac.za/oai/request. Use the following to validate your base URL:
- Open Archives Initiative Protocol for Metadata Harvesting (OAI-PMH)Validator & Data
- Open Archives Initiative – Repository Explorer
Start registering your repository with the following:
Step 8: Marketing
As with every new service, potential users need to be informed about the possible benefits of the repository. In the first instance it is important that researchers buy into this service and start submitting their research output because of the many benefits offered through Open Access. Secondly, researchers from all over the world should be made aware of the new service in order to increase usage of items in the repository. This marketing should be done on the following levels:
- Institutional marketing: amongst local user community;
- National marketing: make funders, publishers etc. aware of the newservice; and
- International marketing: increase the visibility so that others know aboutthe service and that research can be accessed free of charge.
The LEADIRS Workbook by Barton and Waters (2004) contains a comprehensive section on marketing a repository (incl. Open Access). It is advised that a Marketing Plan with timeline be compiled to coordinate all marketing activities. The following are suggestions on what approach to follow:
- Identify possible audiences (institutional, national, international)
- Identify key stakeholders on campus to work with (Research Office, IP Office, Registrars’ Office, Marketing & Communication Office etc.)
- Decide which approach will be followed: top-down or bottom-up
- Develop marketing material: web page (also add service to institutional web page), help wiki, pamphlets, video clip uploaded to YouTube, posters etc.
- Identify events during which the repository can be promoted: road-shows, open research days, orientation sessions, Open Access Week, conferences, workshops etc.
- Social media: make use of twitter, facebook, blogs, mailing lists, etc. to announce or put the spotlight on new services, new software features, high profile researchers, high profile research conducted etc.
- Newsletter: issue a newsletter to keep all researchers informed on Open Access developments, publisher policies, usage of repository content etc.
- Identify early adopters (champions) and run a pilot with this group. Once the repository has proven to be successful with this initial group, it will be easier to sell the idea to other researchers and stakeholders.
Marketing is an ongoing process since new developments need to be communicated, and new researchers will have to be updated on services such as the repository. Also see the Marketing Communications Plan as part of the Business Plan earlier in this chapter. There are numerous web pages on the web containing marketing material, which can be adopted for own purposes:
Open Access Week http://www.openaccessweek.org/
SPARC http://www.sparc.arl.org/about
OASIS http://www.openoasis.org/
Step 9: Training and user support
As with marketing, training is an ongoing process. The system software might change, which will require additional training, and new researchers might join the institution, which will also require training. As you plan your service, consider the amount of training and support you will want to offer (Barton & Waters, 2004). Each of the varied user groups needs general exposure to the service –its features and how it is it used. In addition, library staff who create metadata and add content need training specific to their jobs. Academics and their designated content contributors need training in adding content to the system and setting up content areas for departments or research centres. Training might include:
Library staff
- General procedures, understanding the service goals, etc.
- User interface, adding content
- Metadata procedures
- Search methods
Researchers/Academics and Academic/Administrative Staff
- General procedures, understanding the service goals, etc.
- User interface, adding content
- Metadata creation
- Creating a post-print pdf
Also take into account the different types of learners and their preferred learning styles when creating learner materials, and make provision for more than one learning style:
- Visual: prefer pictures/images e.g. animated tutorial/visual presentation/video
- Aural: prefer sound/music e.g. podcast
- Verbal: prefer reading e.g. quick guide with steps (self-help)
- Physical: prefer hands-on e.g. self help
- Logical: prefer hands-on e.g. in an e-classroom
- Social: prefer group learning e.g. group orientation sessions
- Solitary: prefer individual learning e.g. self help
Depending on the type of learner, the following can be used to conduct the training:
- Podcasts
- Webinars e.g. BigBlueButton
- Animated tutorials e.g. Camtasia Studio
- Pamphlets
- Manuals
Training can be promoted in collaboration with other key stakeholders on campus, through the institutional web, the library web, as well as through social media tools. The training program should be made available well in advance, and also included as part of the overall institutional training planning program (calendar). The repository management team itself should also stay current on new developments through enrolling to mailing lists, newsletters, conferences, presenting and authoring papers to share experiences, and many more.
Step 10: Populating the repository
Populating the repository with content can be challenging, especially if no Open Access policy is in place, and if it is a new service. The following tips are guidelines on how to increase the size of a repository:
- Since it is labour intensive and costly to maintain more than one repository, consider centralising all repositories within an institution.
- Although the ideal is to only upload full text content to a repository, consider making at least bibliographic records available via the repository. Add a note such as the following to each record: Please help us populate the repository by e-mailing the post-print version of the article to .....Bibliographic records can be batch imported from the library catalogue (records of printed theses/dissertations), the annual research report for an institution, or e.g. Scopus alerts. Through making bibliographic records more visible, you will be able to get an indication on which material should be prioritised.
- Digitise retrospective theses and dissertations and upload to the repository. This will depend on whom the intellectual property (especially copyright) belongs to.
- Set up alerts e.g. with Scopus. This way you will be notified once a new article is published by a researcher within the home institution, and can then follow up immediately while the post-print is still available.
- The repository should be an organisational commitment, and the responsibility of all. Involve faculty librarians, cataloguers, inter-library loan staff, and key stakeholders such as the research office, intellectual property office, marketing etc.
- When a thesis/dissertation is requested via an inter-library loan, digitise it immediately and send the link to the requesting institution.
- Keep researchers informed, and advise them to not sign away their copyright. Also provide them with a disclaimer which can be attached as part of an agreement with a publisher. See the licenses to their work.
- Work with the alumni office and try and get hold of retrospective theses/dissertations and research articles.
- Properly brand the full text and make it Google friendly, e.g. by adding the url of the repository and the institutional repository name to the header as a watermark. This way – when the full text is printed or saved – the reader will be reminded where the primary document was hosted and will cite it accordingly.
- Create social networking accounts and use widely to communicate new submissions etc.
- Once an Open Access policy has been approved, implement a workflow between the research office, repository and registrars’ office. Follow a holistic approach and identify how the systems can communicate with one another, without adding to the existing workload. E.g. if academics are required to report on research conducted, the research can be submitted to the repository and a report can be exported to the research office system. If students are required to submit their theses/dissertations electronically, establish a workflow between the administrative system (registrars’ office) and the repository.
- Encourage researchers to create links to items available in the repository from their personal profile pages on the WWW (incl. LinkedIn, facebook, faculty/departmental pages, wiki’s etc.), Curriculum Vitaes, and from research reports. This will result in generating even more traffic to items in the repository, giving it more exposure.